Creating and Managing Reminders Scripts
The script of a reminder is what your message will say to patients to remind them of an upcoming appointment. Scripts allow you to personalize your messages with information you want your patients to know about for their upcoming appointments.
What do I need to do first?
Before you begin creating script templates, take the following items into consideration:
Use the prebuilt script library
Library scripts are a prebuilt list of scripts that provide you an easy way to get started with Reminders messages. These scripts are available in English and Spanish and can be uses as-is or copied and customized to fit your needs.

Consider Appointment Types
Think about the types of appointments you are creating scripts for. If you’d like to use different scripts for different appointment types, create new scripts and make them specific to each of your appointment types.
NOTE: Depending on your EHR, your appointment types may be synced as part of the Updox integration. Appointment types are discussed in the “How to: Use Scheduling Configurations to Customize Reminders” video you will find in the Updox Knowledge Base.
Gather Contact Information
The outreach of Reminders is only as good as the information in your system so make sure to gather phone numbers, including cell phone numbers, and email addresses for your patients.
Creating a Reminders Script
Brand New Script
To create a new Script, first navigate to the Reminders app and click on the Scripts tab.
If you have an existing active scripts, they will be listed along the left side of the page. Click on one to review it's contents.

If you are an admin, you can create new scripts by clicking the + New Script button in the top right corner.
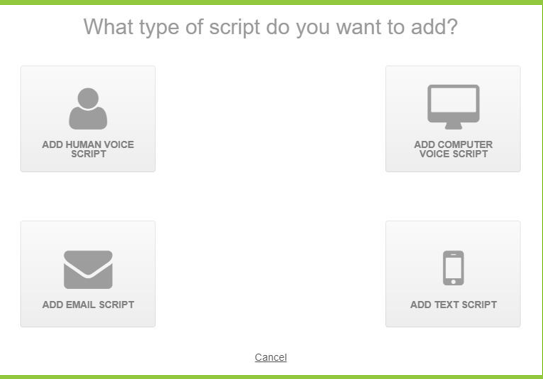
Choose a communication method for your script.
NOTE: Email scripts will have a default subject line of "Upcoming Appointment Reminder". This is currently unchangable.
Give your script a name and type the body of the message in the message field. You can personalize the message by using variables, like your practice's name or phone number. Available variables are listed in the blue box on the right side of the page.
NOTES:
- Variables will display actual data in the reminder message when it is sent. For example, your message will say “Bill” in place of the “[firstname]”.
- Variables function the same in Spanish versions as English, so be sure to include them as needed.
For messages in Spanish, click the + Spanish Version button.
NOTE: Updox does not translate your scripts into Spanish. While we have Spanish versions of our Library scripts in place, you will need to enter your custom scripts already translated.
Ensure the Active checkbox is checked when you are ready for the script to be used.
If you want to make the new script the default for all reminder emails, click the Make Default Script button.
NOTES:
- Each method (phone, email, text) is required to have a script designated as the default.
- The default script will always be used for reminders that are not specific to an appointment type. Scripts based on appointment type override the “Default” script. Library scripts are not based on appointment types.
To see an example of what your message will look like upon sending, click the Preview button.
When you have configured your new script, click Save Script.
The script will appear on the left side of the screen in the appropriate Active or Inactive dropdown based on how the script was setup. If you made a script the default for the communication method, a star icon will appear to the right of it in the list.
If you need to edit the script after creating it, simply click the Edit Script button and make the necessary modifications.
Creating a New Script based on a Library Script
Library scripts are located under your active scripts. 
To create a new script based on a library script, click Duplicate Script and then edit as needed. 

NOTE: Only the default button is editable on Library Scripts. No other modifications are allowed on Library scripts.
How Do I Set Up New Script Templates?
The process for setting up new Script Templates is the same.
Step 1:
Navigate to the library of scripts page by following Steps 1-6 above.
Step 2:
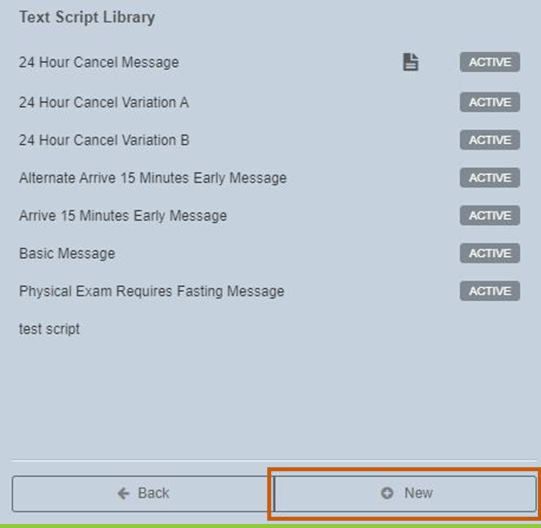
Instead of selecting an existing script, select “New” at the bottom of the Scripts tab

Step 3:
Choose what kind of script you want to create.

Step 4:
A blank screen will appear to create your script template.
Make sure to include:
- A Script Name
- Text for the script
- Variables, if you want. They aren't required.
- A Spanish version, if desired
TIP: If you choose to customize your scripts based on appointment type, you will select “New” to create scripts. Prebuilt library scripts are not based on appointment types.