Refer & Share
Updox Refer & Share allows you to invite your colleagues/business partners to use Updox secure messaging FREE of charge.
Benefits of Refer & Share
- Secure - HIPAA-compliant secure messaging
- Web-based - Accessible anywhere via the web
- Cost Effective - Absolutely NO charge to send or receive documents
- High Quality - Crystal clear documents are far superior to faxes
- Auditable - See when a document was viewed or easily label, organize, and search for documents sent or received in the past
- Edit and Sign - Easily markup and/or sign documents without printing
- Two-way - Drag and drop your own documents into Updox to send to any other Updox user in our network
- Unlimited - Unlimited users, messages, uploads, and referrals to all subscribers
How it Works
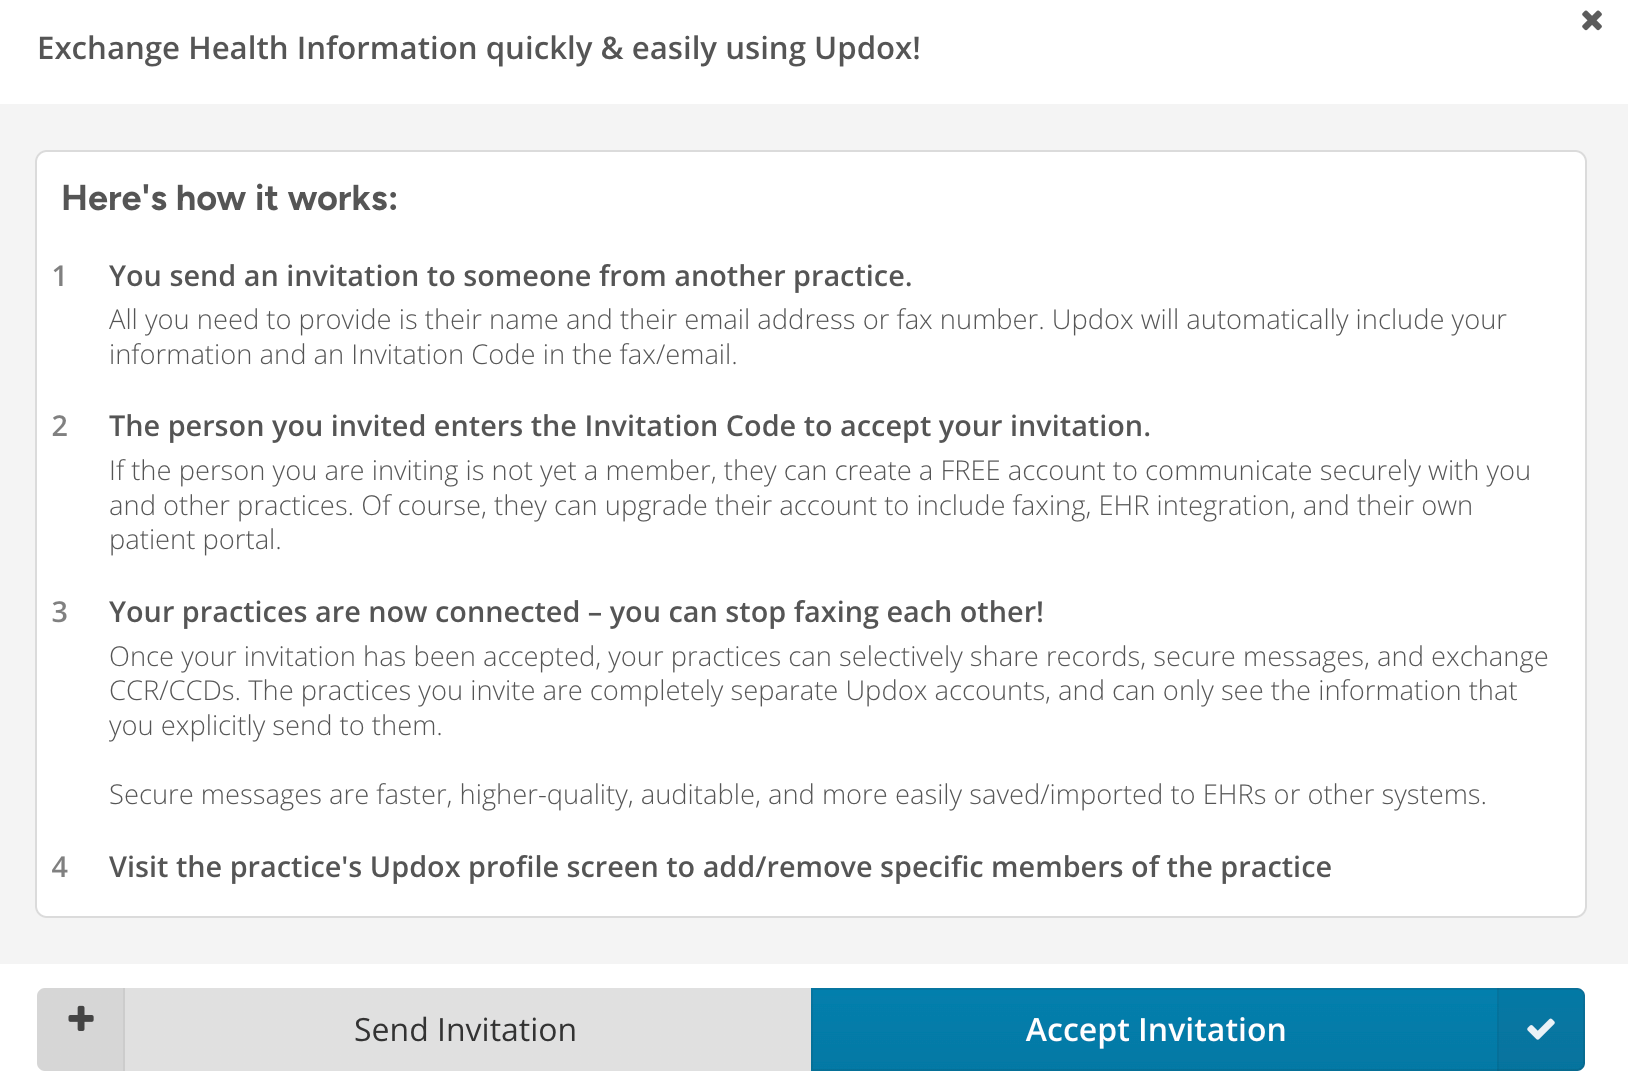
- You send an invitation to someone from another organization. All you need to provide is their name and their email address or fax number. Updox will automatically include your information and an invitation code in the the fax/email.
- The person you invited enters the Invitation Code to accept your invitation. If the person you are inviting is not yet a member, they can create a FREE account to communicate securely with you and other organizations.
- Your organizations are now connected – you can stop faxing or mailing each other! Once your invitation has been accepted, your organization can selectively share records, secure messages, and exchange CCR/CCDs. The organizations you invite are completely separate Updox accounts and can only see the information that you explicitly send to them.
- Visit the organization’s Updox profile screen within the Updox Address Book to add/remove specific members of the organization.
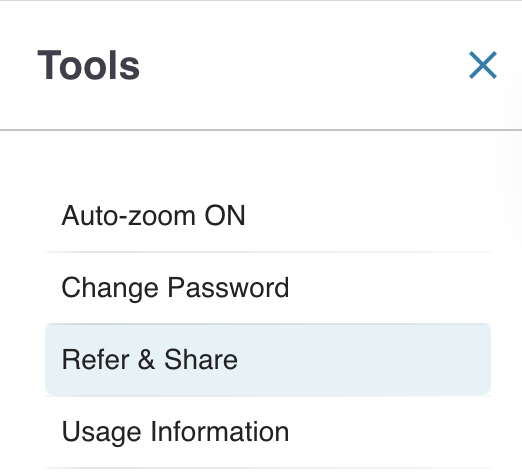
How to Send a Refer & Share Invitation
- Log in to Updox.
- Click Tools.
- Select Refer & Share.
- Click Send Invitation.

- Enter the name of the contact you would like to invite.
- Enter the email address or fax number for the contact.
- Click Send Invitation.
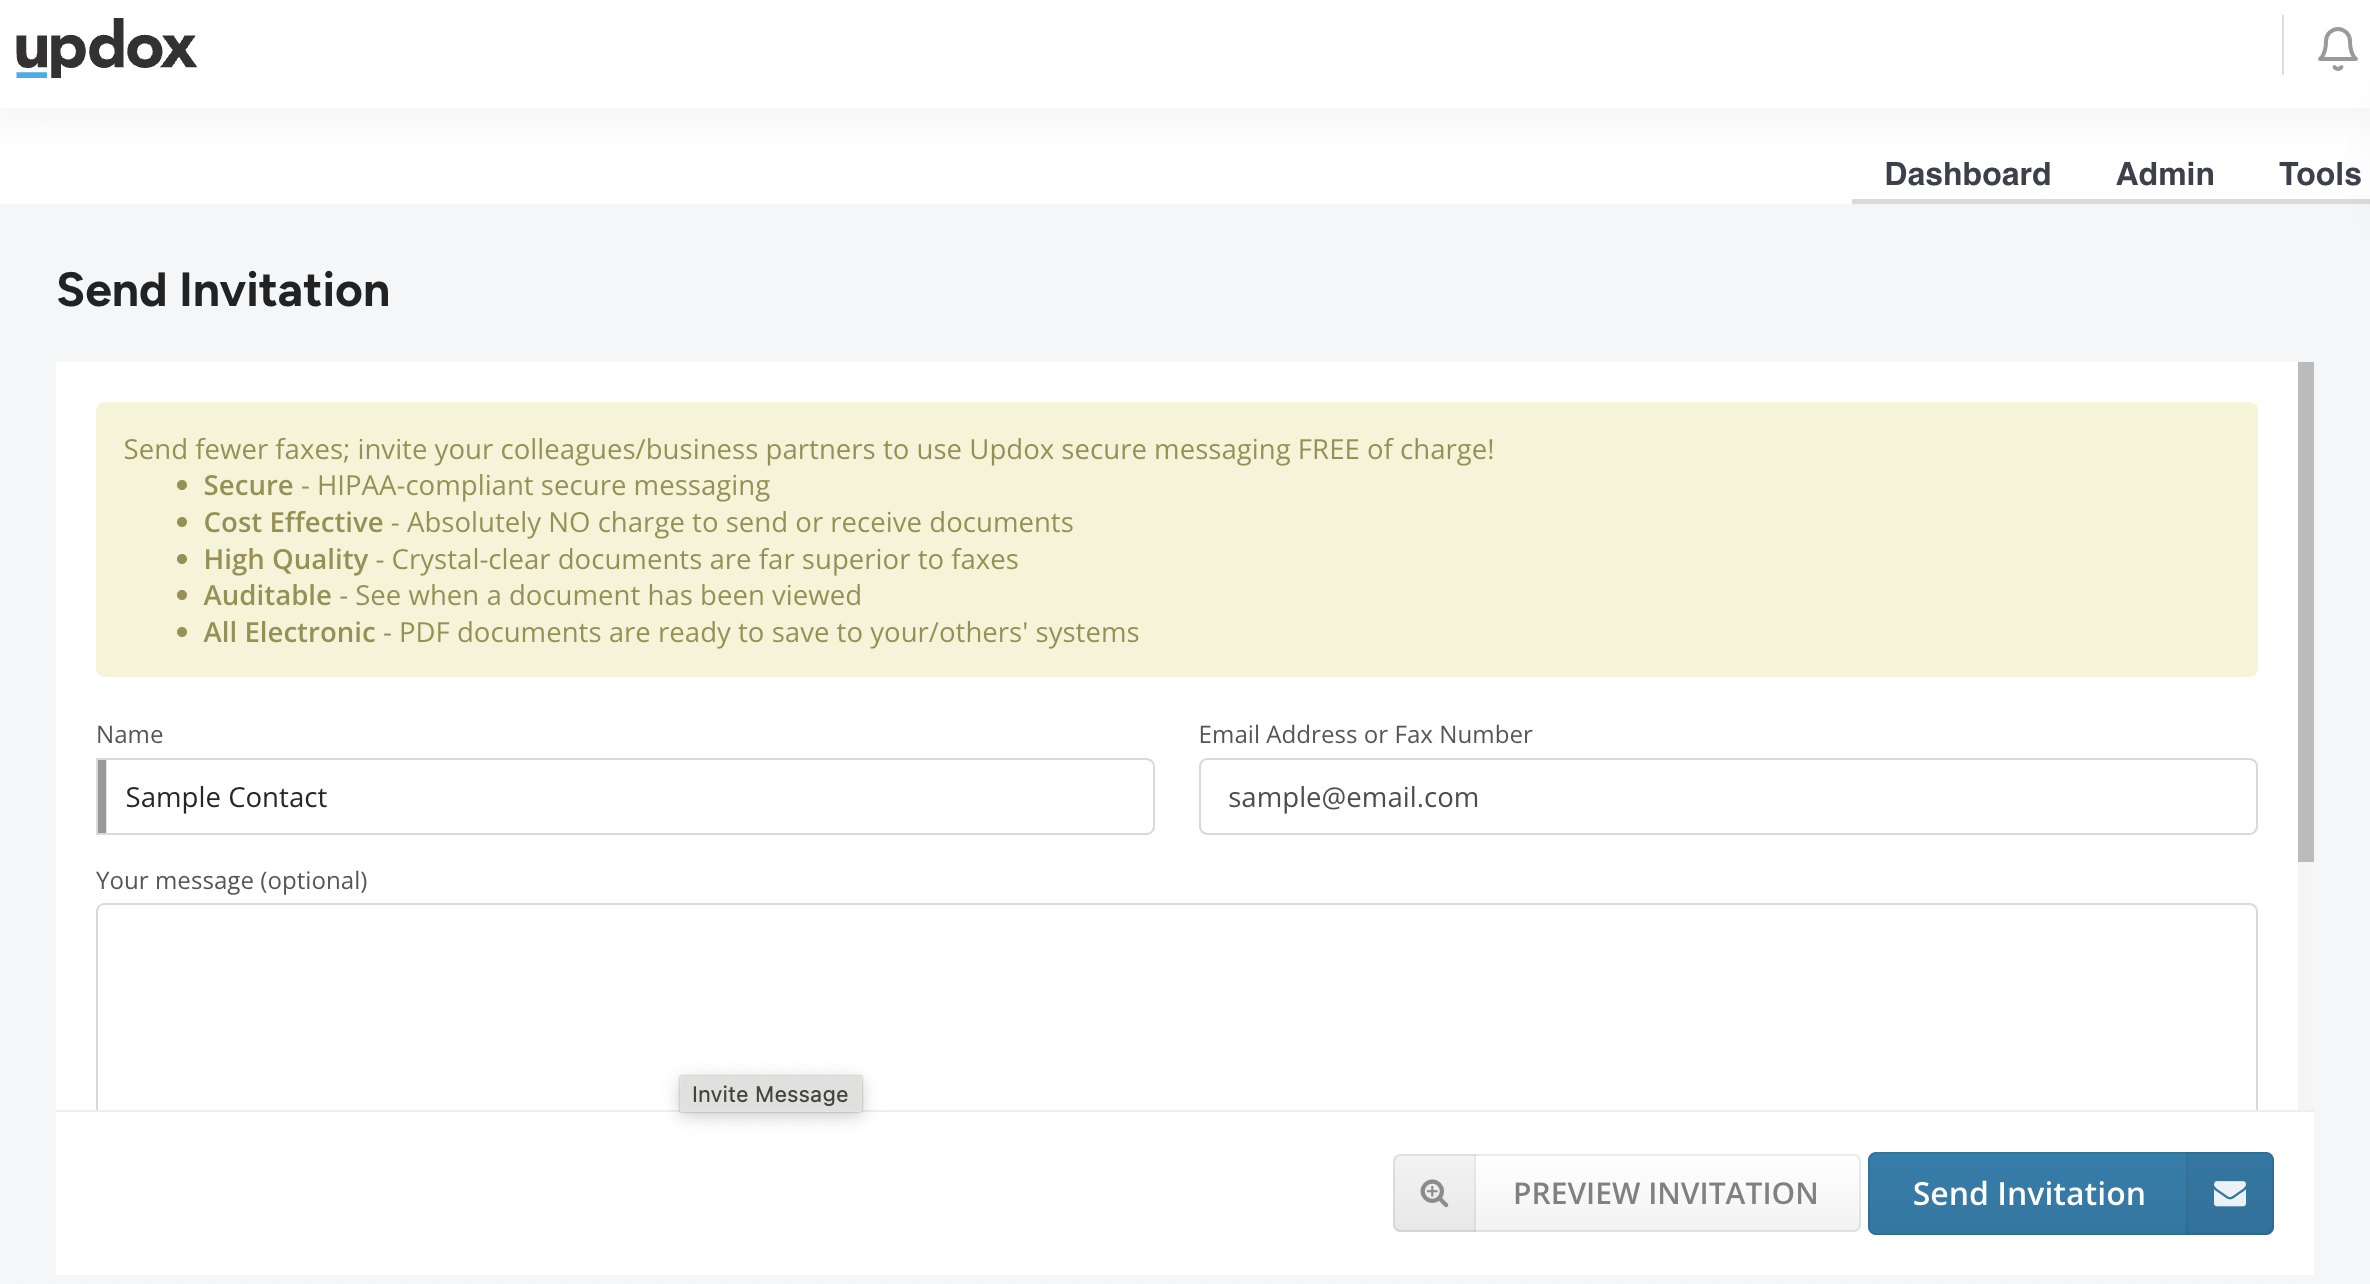


Note: You can send an unlimited number of invitations.
How to Accept a Refer & Share Invitation
- In an email invitation, click the provided link. In a fax invitation, locate the web address. Then, enter the URL in your web browser.
- A web page then displays with multiple options:
- I would like to create a FREE Updox account and have an NPI.
Updox can expedite your registration by pre-filling most of the information we need for the next step.
Sign Up with an NPI
- I would like to create a FREE Updox account and don't have an NPI.
We will prompt you for everything you need in the next step.
Sign Up without an NPI
- I would like to start a full account.
Includes inbound/outbound faxing, your own patient portal, optional appointment scheduling, optional online billing/payments and more. **A valid credit card is required.
Start full account
- I already have (or my organization already has) an account.
Log in to your account
- I would like to learn a little more about Updox before I continue.
Visit updox.com (link will open in a new page).
New Updox Account
- When opening a new account, complete the following information on the registration page:

- First Name
- Last Name
- User ID (email)
- Invitation Code (from the email or fax)
- Organization Name
- Address
- State
- Zip
- Fax number (optional)
- Phone
- EHR (enter n/a if you don't use an EHR)
2. Click Finish.
3. An email is sent to the address entered in the user ID field with log in instructions. Log into Updox using the user ID and temporary password from the email.
4. Change your temporary password by going to Tools > Change Password.
Existing Updox Account
- Log into Updox: https://myupdox.com/updox-ui/
- Click Tools > Refer & Share.
- Click Accept Invitation.
- Enter the invitation code.
- Click Accept.


After entering the code
- The inviter's organization will be added to your organization's address book.
- Your organization will be added to the inviter's address book.
Add Members to Your Address Book
Although each organization will now be listed in the address book of the other organization, if you’d like to securely message specific members of the organization or a specific queue, add them to your address book to begin secure messaging that member or queue.
- Go to the Address Book.
- Search for the name of that contact/organization.
- Select the contact/organization from the search results.
- Click on the Practice Members tab.
- Click ADD TO THE ADDRESS BOOK by each user/queue you wish to add.
- When finished, click the X in the upper right corner to close the Address Book.

Sending a Secure Message
- Click Compose or Send Item on an Inbox item you wish to send.
- Search for the name of the contact/organization.
- Select the contact/organization from the search results.
- Select the option to secure message and click OK.
- Enter a Subject.
- Enter a Message (optional).
- If you need to include additional documents, click the + under attachments, browse, then select the files you wish to attach.
- Click Send.

Replying to a Secure Message
- Click Reply on the secure message item in your Inbox.
- Enter a message (optional).
- If you need to include additional documents, click the + under attachments, browse, then select the files you wish to attach.
- Click Send.
Questions
Reach out to Updox Support at https://updox.com/support.