How to Use Messenger on Your Desktop
What is messenger?
Messenger is a HIPAA-compliant, intra-office messaging product that combines all your team communications into one place, increasing productivity and staff collaboration.
Messenger Supports
- One-to-one messaging
- Group messaging
- Channel messaging based on teams, topics or workflows
- Attachments (video and audio files, documents, images)
How do I use Messenger?
Before you begin:
Messenger Channels
Messenger can be organized into channels based on topics, teams, workflows or whatever makes sense for your office.
Note: You can also think of channels as chat rooms.
Tip: Think about the channels you will need and who should be members of those channels. You will have the opportunity to set up channels later in this document.
Desktop and Mobile Access
Messenger is available on both your desktop and mobile devices. The same features are available on both.
To use Messenger on your mobile device, go to chat.myupdox.com.
Getting Started
1. From the Inbox, select the Messenger bar found at the bottom of the screen. You have the option to select a full-screen display or a partial-screen display.
Tip: Selecting the partial screen display will allow your Inbox to stay visible.

2. From the Messenger landing page, you have the option to view prior chat activity from the Messenger menu, start a new message, or create a new channel. We are going to begin by sending a simple one-to-one (direct) message. Select Create Direct Message.

3. The staff directory is auto-populated with users who have logged into Updox at least one time. Search who you want to chat with, enter your message, and send. It’s that simple! Select the paper clip to add an attachment to your message.
Note: Most file types are supported but have a maximum file size of 50 MB.
The Messenger Menu
Select the Messenger menu from the top left side of the Messenger window. The menu is always accessible and displays all your chat activity. You can also start new messages from here, continue previous conversations, or create new channels.
Tip: Keep the Messenger menu open all day as your communication hub.

From the Messenger menu, select the + sign beside Messages to start a chat session with a new user. You can also create a new channel by selecting the + sign beside Channels.
Note: Any user or group you have previously chatted with will already be listed. Select any of them to continue the conversation. The history of all previous messages will be displayed.

Chat Groups
You can also chat with groups of users. A chat group can be easily created by adding multiple people when you send a message. From the Messenger menu, select the + sign beside Direct Messages (see above) and add multiple users to your message. Chat groups you have previously used will be listed in the Messenger menu. Select the group if you want to continue the chat. The history of previous messages will be displayed.
Note: Think about who should be in the group before you send the message. You will not be able to add people to an existing group later.

Channels
Messenger can be organized into channels based on topics, teams, workflows, or whatever makes sense for your office. We can think of channels as chat rooms. You can create a new channel either from the Messenger menu or the Messenger home screen. For this exercise, we are going to create a channel from the Messenger menu.
You can think of channels as a permanent kind of group with the added flexibility of being able to add and remove members as needed. Select the + sign beside Channels to create a new channel. When the screen changes, you will be asked to give your channel a name and select the members of the group.  Channels can be designated as private or public. Any user can see and chat with a public channel. You must be a member of a private channel to chat with that channel. Private channels are displayed with a lock in the Messenger menu. Simply name the channel and add the users to create it.
To add a member to an existing channel, go to the Messenger menu and select the channel. Next, select the information icon at the top of the screen.

The Chat Info screen shows all the current members of the chat. Select Invite People. Search for the members you want to add. Click Invite to add the new members to the channel. 
Another feature of Channels is the ability to create an @mention. To get the attention of a channel member, use an @mention in your message. @mentions are entered with @ sign followed by the username @username for example. Using an @mention in a message will also invite a user to a private channel.
Note: An orange icon will display on the Messenger menu to alert the user that there is an important message they should view.

To leave a channel, go to the Messenger menu by clicking the info icon and click Leave Chat. If you want to rejoin a channel, you will need to be invited by a current member of that channel.
Note: Only the member can choose to leave a channel. There is no concept of a channel admin.

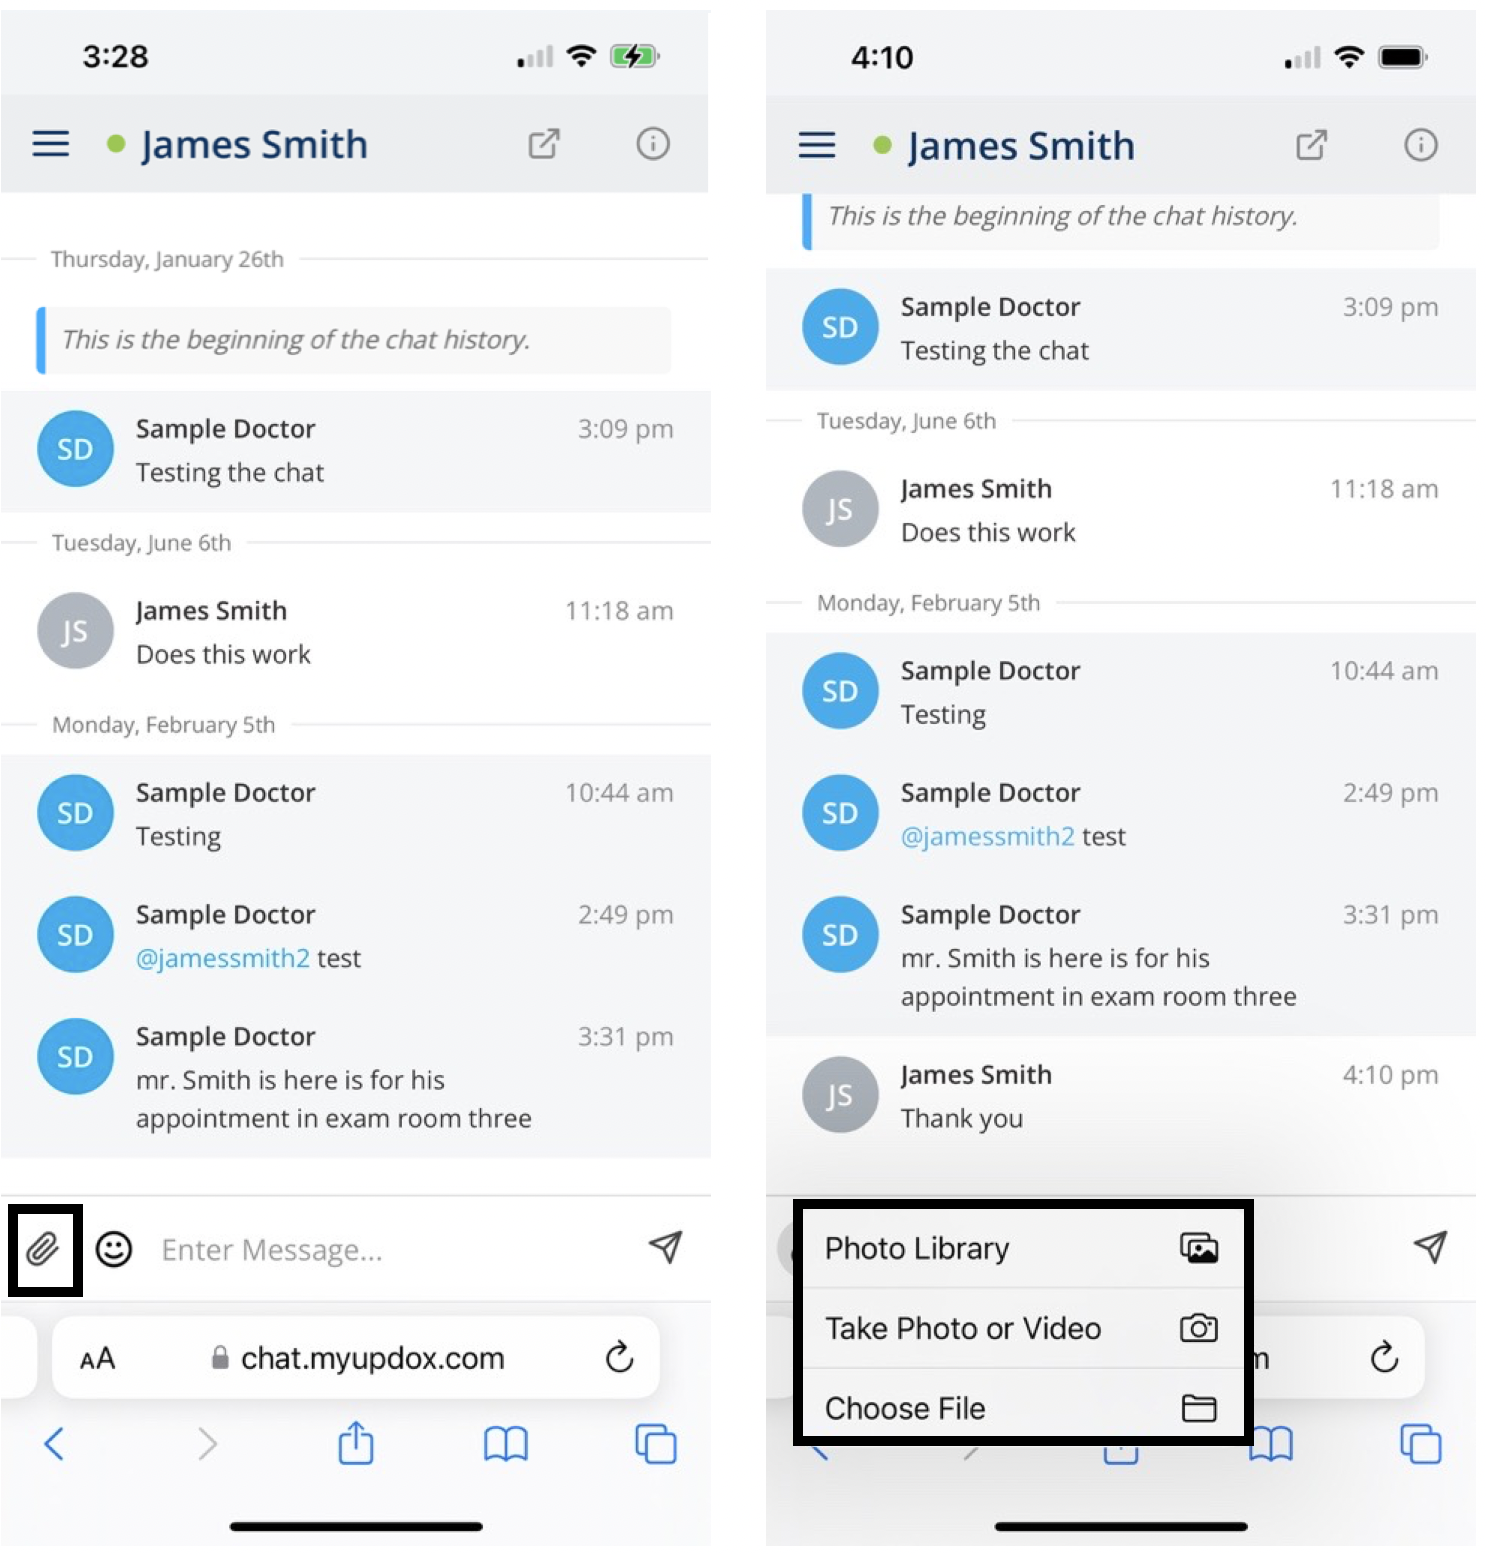
How to Use Updox Messenger on Your Mobile Device
When using Messenger on your mobile device, you have access to all the same features that are available on the desktop version. The interface is the same so this section of the job aid will focus on using attachments on your mobile device.
Browse to chat.myupdox.com on your mobile device. Use your Updox username and password to log in.
The mobile landing page is the same as the desktop. You have the same options to start a new message, create a new channel, or go to the Messenger menu to see existing activity.
Note: All of your activity shows on all devices.

To attach a file or image to your message, select the paperclip. You will have the option to take a picture with your camera, add an image from your photo library, or attach a file.
- If you choose Photo Library, we will access the photo library on your device. Select an image and it will attach to your message.
- Take Photo will access the camera on your device. Take a picture and select Use Photo. The image will be attached to your message.
- The last option allows you to attach files. The Browse option will look for folders on your device where you have saved documents.

You can also use your device's speech-to-text feature to dictate your messages. Speech-to-text can be a great tool to use especially if you are on the go from exam room to exam room. Select the microphone on your device and begin speaking. You will see your speech convert to a text message.
